This is an ongoing project and the material here is incomplete; more will be added periodically as the project progresses.

THE OVAL TABLE
When the big heavy copy of the Hippie Modernism show catalog arrived it was about the same time that we bought another big book about the artist Dellschau. Now we had more coffee table books but no coffee table; time to make one. Many years ago, one was designed for a client, an oval table, though while hers was quite large, made of stone and weighed a ton, a smaller oval table it would be.
Why an oval table? There can be multiple inspirations for taking on a new project. What at first might seem whimsical and "off the cuff" can have motivations that have an unexpected depth. As we worked I realized that years ago I had become fascinated with the ellipse shape. Paintings by Larry Poons back in the late sixties were part of what aroused my interest. During that time I did some paintings based on the ellipse.
First thoughts about an Oval Table
We were inclined to draw an oval for the top, cut it out with a jig saw, add legs, glue it up and lay on the big books. But the idea called for something more than playing it the easy way so we asked, "Should the shape be an ellipse or just an oval"?
We started out by figuring out how to draw an ellipse mechanically. That process led to learning about the Archimedes compass (and trammel) which got us going. We made a few stabs and trials. The ellipses were crude at first but we got better until we saw fascinating videos of the trammels with routers attached. Figuring out a trammel and making it seemed like more trouble than what was called for by a quickie coffee table.
The question became lay it out, cut the parts and sand it into shape or make a trammel that held the router and promised a much cleaner, more sophisticated result. We learned how to draw an ellipse with some ease so it was mockup time. Foam board was cut into an ellipse about the size we'd need and legs were added.
We thought we'd make the legs of the same material as the top and locate them along the major and minor axes of the ellipse. Elsa pointed out that legs of that configuration might cause tripping and toe stubbing, suggesting that they be on diagonals. We made the mockup but it looked silly with the legs too weak a part of the overall design.
Sketches were begun, looking for a better relationship between the top and its base. Placing the mockup in the parlor by the sofa, we saw that the oval top was a good idea. A rectangular table would have been a knee-knocker in the limited space we enjoyed.

The Mockup
The ellipses and curves on the legs were laid out on the computer. We scanned pencil sketches, set them up in Illustrator on a layer and traced them on another layer. When the curves for the leg openings were traced the computer version came up quite close to the sketch and seemed really close to our idea of that curve being elliptical too. A larger, long ellipse was laid out so that the arc at one of its ends became the leg arch. A special trammel would be needed for cutting the leg curves.
Enough time had been spent on the design and it was time to cut wood; the lure of the trammel kept raising its head. I asked Jim why we would want to go to the trouble of making it when we could just lay things out and get it over with. His reply, "It might be worth it for the experience" was appealing and we have nearly 170 years between us so why not another "experience"? The trammel turned out to be worth it even though there were lots of little problems to solve in its making. What seemed to be a nice simple idea turned out to be a multileveled, fascinating puzzle.

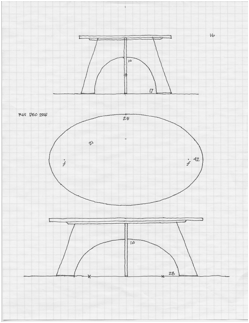
Oval Table Major Parts Schematic
Videos provided lots of versions of the trammel; it turned out there were a lot of ways to make and use the device. Some fudging, trial and error was required to get things aligned but perseverance furthered. We aimed at setting things up so the process would be as smooth as possible when we finally started cutting.
Without being conscious of the decision to make a table that could be taken apart, we proceeded on that path nevertheless. Seeing other tables of the same size we realized how they were usually "of a piece", solid entities with no conceivable way of taking them apart or reducing them to the components of table top and support. Our furniture designs tended to be reducible so that when it wasn't needed, the object could be stored easily and even shipped. That sort of thinking, in terms of "prototypes", can lead to complexity in spite of intensively striving for simplicity.
The whole process was a series of challenges. If it was not thought through thoroughly to become a logical procedure, we'd come up against a variety of disasters that could put us back to the beginning. The making of parts had to be organized to avoid snags that lay hidden in the process. Our thinking and conversation was like, "Lets see, if we cut this now what happens when we try to glue that on later?" or vice versa, "If we glue this up now, we won't be able to cut that, later. Will we be able to clamp or will the shape make clamping difficult? Impossible? Too many extra steps?" Some of the puzzles were defined by the tools we had and the limitations within which we had to work.
The magical movement of the trammel is hypnotic. The screaming router, the need for care and to move so that the cuts were consistent required concentration. There was slop in the mechanism that had to be accommodated. Dust collection problems were handled with help from friend Rube Goldberg, a most reliable source of inspiration.
The vacuum was set up on top of the table saw. From the shop's balcony, we ran a heavy rope from one side to the other. The vacuum's hose went over the rope and its nozzle was mounted in close to the router bit. The power line to the router was wrapped around the vacuum's tube. This made going around the piece to be cut a smoother, continuous motion without any interruption of the process as the cut was made.

The Vacuum Set-up
We contrived a few fixtures that eased the way as we proceeded. The legs would be made so they interlocked in the way an egg-crate grid is assembled. A notch in one would slide down into a notch in the other and the "X" it formed would fit into slots on the underside of the table's top. The problem with that scheme was that there would be a notch at the top of the leg's arc. We had no way to cut that notch unless the top part of each leg were separated from the arched part and then reattached to the lower part.

Upper leg intersection trial and resulting fixture
If we cut the notches in the upper part of the legs we could do so on the table saw with the saw blade adjusted to make its deepest possible cut. After a bit of sketching and fiddling and we had angles that looked good. Once we were satisfied with the trial piece for the base, it was abandoned, kicked around and got in the way until we realized it might have some use supporting the top pieces as we worked on them. That gave us a fixture to use as a platform for the trammel when routing the table top's ellipses.
There were a lot of decisions that would have been made based on old habits of taste or design ideas that didn't apply comfortably to what we were making. Ultimately the object, the table itself, told us what we needed to do. When we blocked up the parts and saw it as an actual "piece", aspects of it were disturbing. Resolving them might require violating beloved habits of design like "sharp edges". An aversion to working with the common 3/4" thickness of plywood for the legs eventually weakened. As we looked and poked, we felt a need for softer edges. An alternate thickness for the legs was no better visually.
As we neared a finished table, Jim wondered what would happen when "glides" were attached to the legs. Glides? That was something we hadn't considered before at all. The sharp points at the outside corners where the table legs met the floor were fragile. That was solved by cropping them slightly with a blunt corner that would resist splintering. Glides. Looking at the possibilities we turned to Delrin. We had some and knew how to shape it so we came up with a design for an inset glide.
The fixture count required to make the table had come to four. The trammel for the ellipses, the trammel for the leg arches, a fixture for the leg-into-the-top slots and a fixture for the straps that connected the base to the table. Cutting slots for glides into the feet of the table's legs would bring the count to five.
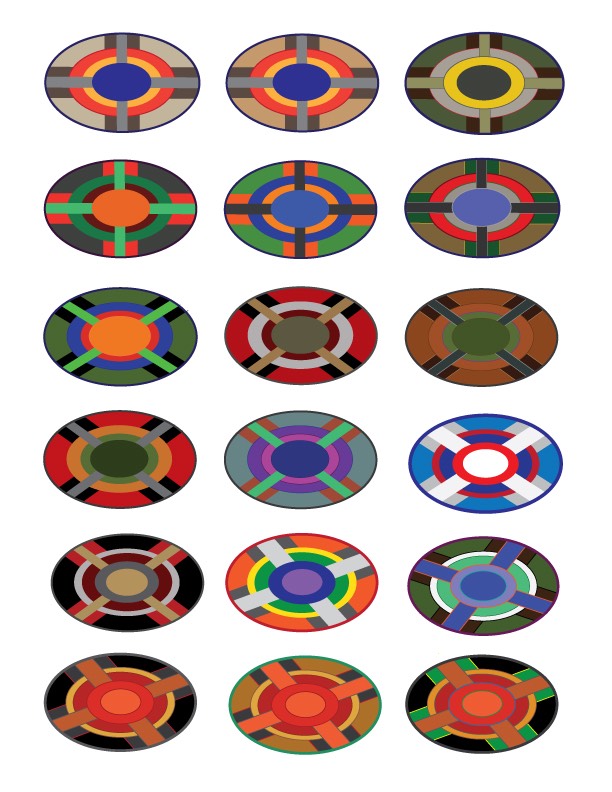
Finally, a table. Assembling the two tables seemed to instantly inspire piling junk upon them as the possibilities for finishes were explored. First, it was decided that one of the tables would be finished “naturally”, i.e., finished so that the original surfaces were protected by a clear finish like varnish. The second version would be decorated. The first schemes were for a variation of a sun burst but on seeing it, it was easy to set aside. Other chores required setting the project aside temporarily but we looked at various elliptical studies we’d explored in the past.
There’s been some thinking about ways of decorating an oval table, 54 thoughts:


Winter, 2017: Work on the Oval Table has been suspended until the weather warms up and we can work in our shop with the doors open as we apply finishes.